Help Manual
First Configuration
Watch more help videos
LOGIN
In this screen we will enter the access data.
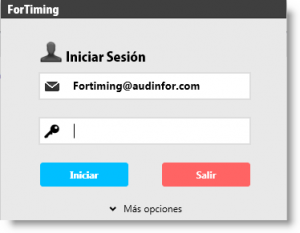
The password is of the secure type and must contain some combination of 8 characters with at least one lowercase letter, one uppercase letter and one number. For example “Gotham21”.
If we have forgotten the password, in ‘More options’ we will find the option to recover the password.
By using the Remember Me and/or Remember Password options we can avoid having to type our username and/or password every time we log in.
WARNING: These options should not be left checked on computers with public access.
TIME REPORT ENTRY
This screen is where we will spend most of our time. Here we will record our daily activities and the time we use to carry out certain Activities (tasks) in different Cost Centers (jobs, assignments, projects).
“This morning I spent two hours preparing the documentation to complete the planning phase of the Ruino, S.A. audit work.”
This would be recorded as: Cost Center: “Ruina, S.A. audit work”. Activity: “Planning” and 2 hours in the box for today.
“I have just come out of an hour and a half long meeting in which the Office Manager briefed us on the particulars of the appraisal work we are carrying out for our best client.”
This would be recorded as: Cost Center: “Expertise work X”, Activity: “Meetings” and 1.5 hours in the box corresponding to the day of the meeting.
COST CENTERS
These are economic units that consume resources by the organization and, in this case, consume hours of the professionals working in it.
They can be called jobs, projects, assignments, etc. and, in the case of being billable, they are normally associated with a service contract.
They can be selected from the drop-down menu or a complete list organized by Departments and Work Types can be displayed by clicking on the detail icon.
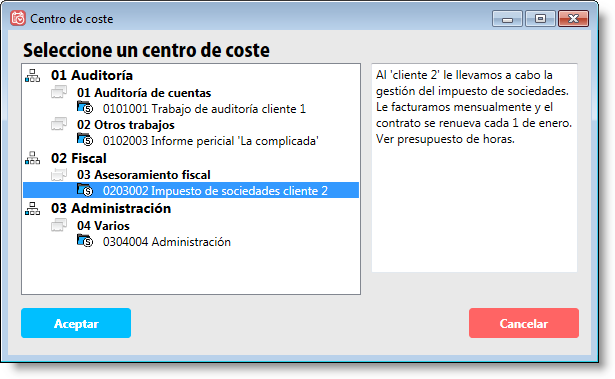
These cost centers can be of three types: Billable, non-billable and projects
It is possible to import cost centers through a wizard in the Windows version, check the explanation in the following video:
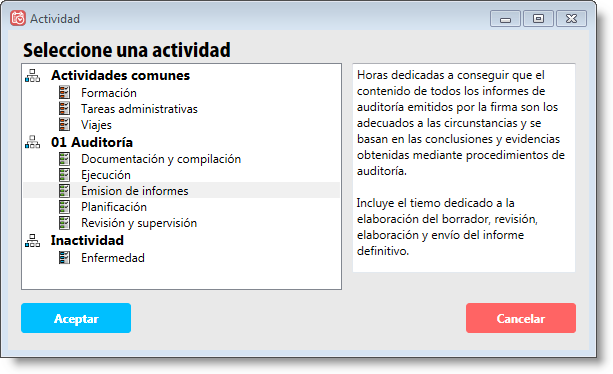
ACTIVITIES
An activity refers to the exact task you have been performing for that particular job, project or cost center. For example, if I am correcting the draft of the final report for our best client’s appraisal job, the Activity will be “Report Issuance” for Cost Center “Appraisal Job X”.
The activity can be selected from the drop-down menu or from the detail icon.
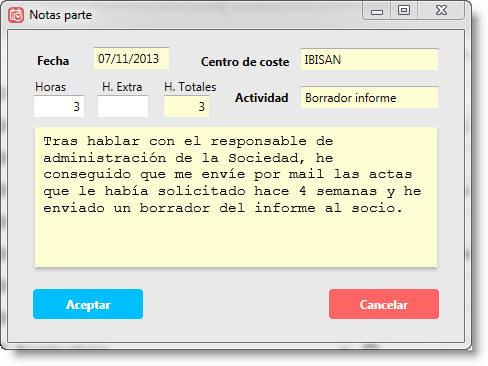
Hours: Hours or fractions of an hour are entered, the minimum unit allowed being 0.25 hours (15 minutes).
Annotations: In each box where we note down the hours spent for a cost center and activity, it is possible to write a text explaining what exactly we have done. By double-clicking or pressing the enter key twice on the box of the specific day, we access the time report notes.
Overtime: Within the note it is possible to specify whether the hour is normal (default) or overtime.
WEEKLY VIEW, BIWEEKLY VIEW AND “TWO-WEEK” VIEW
![]()
![]()
![]()
By default, the view type will be weekly. The change to biweekly or two-week view type is executed directly from the button itself. To switch between the different views, press the view change button again.
2X7 VIEW
With this view we will always be able to view the current and previous week. This will allow us to view and reuse parts of time we recorded the previous week.
Hint: Double-clicking on the date will bring us to the current date, to the present!
CONFIGURATION
![]()
In this section we can configure the following:
First day of the week: You can choose between Monday or Sunday.
Change password: Recommended for the first time you enter the application. We will be asked to enter it twice.
Background application: If enabled, the application is not closed but minimized, unless you select ‘Exit’ from the user menu.
Drop-down menu shows activities: Depending on the option chosen, the activities shown in the quick drop-down menu will be those associated to the user’s department (default) or to the cost center department.
Time report alarm
USER MENU
![]()
From here we can access the login screen to enter as another user or close the application completely.
ADMINISTRATE
This option is only visible to Administrator users.
From here the entire organization of the company is configured and the work centers, departments, staff, clients, cost centers, activities and access permissions are defined.
![]()
In this section we will define all aspects of the organization that are relevant to be able to evaluate in detail the number of hours incurred per work center, per department, per person, etc.
COMPANY
In this section you will find the description of the signature/office.
On the right side you can upload your logo and customize the look of the reports, but please note that it is limited to jpg, gi, png and bmp files!
In the URL you can write the corporate web address.
You can also assign a calendar to let the staff know the holidays and working hours of each day.
Time report blocking: This option is deactivated by default, so time reports can always be modified by the user who created them. In this section you can make reports block after X days from the report day, after X days from the end of the last week (Sunday), or X days after the last day of the month. If left deactivated, the reports can always be modified by the user who created them. There is the possibility for the administrator to temporarily unlock the reports from the staff tab.
Another very interesting option is to lock time records to a specific date, similar to what could be an accounting close. This way we will ensure that no one can make changes to a period that we consider closed.
Assignment of calendars: The application is prepared to be able to work with a company work calendar, with a particular one for each work center or with a specific calendar for each worker. To be able to assign any of them it will be necessary to have previously created it in the Calendar section.
WORK CENTER
The physical locations where employees are assigned are added here. It is also possible to assign a specific calendar for the New York office and the Madrid office.
DEPARTMENT
All organizations have, at least, a minimum level of organization that includes the departments or areas of the company. In this section we will try to describe the organization chart of our company, firm or professional office.
There is the possibility of adding a numerical code to the department if desired.
TYPE OF WORK (OPTIONAL)
In this section we will classify what kind of projects, services or works we perform in our organization. This classification will depend a lot on what our activity is. For example; Tax advisory services, auditing work, tax management, web design, digital marketing campaigns, etc.
It is necessary to take into account an important detail: Each type of work is performed by a different department.
PROFILE
In this section we can, if we consider it useful, define the profile of the organization’s components as described in our quality manual.
STAFF
In this section we will register all the components of the organization. The only mandatory fields are email, work center and department.
When registering an employee or user, we will have to establish the key or password. This is very important because the security of the information is something fundamental and the best way to protect the data is through secure passwords.
The ForTiming password must be at least 8 characters long, contain lowercase and uppercase letters and 1 numeric character. For example: ‘Gotham21’.
Unsubscribing: Unsubscribing a user does not delete their data, it only prevents them from accessing the application. Their data will be available in the reports but it will not be possible to include new time report information.
In the commercial version it will only be possible to register users up to the contracted limit.
Staff import (Windows version)
From the three dots located at the top of the screen Administrate>Organization>Staff you can access the new Import function
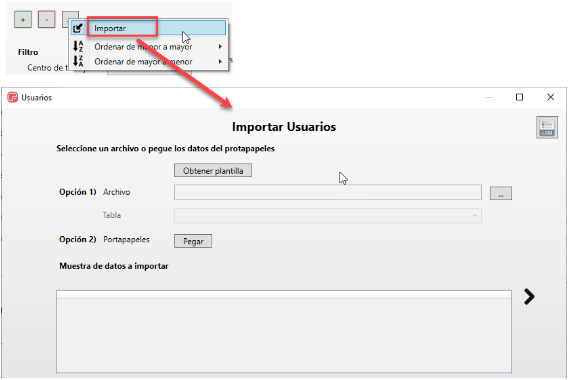
From that screen you can access the template that will indicate the data needed to load the new staff data. The only mandatory data is the email, the rest can be completed later. Using the next “>” icon you can go through the steps of the wizard until you finish the import process.
Sort staff list (Windows version)
From the three dots in the upper left part of the staff administration screen, you can access the options to sort the list of workers and organize it in ascending or descending order by name, surname, email or registration date.
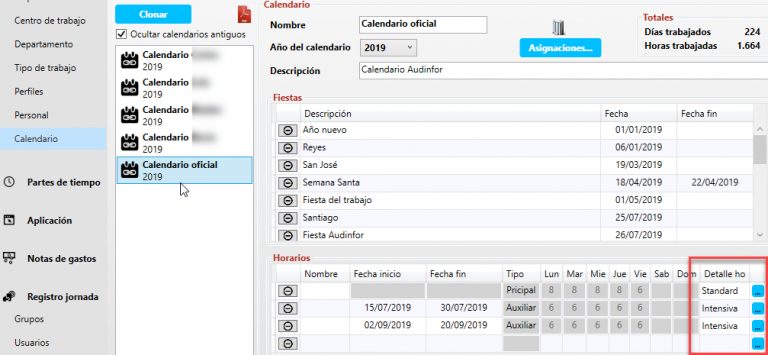
CALENDAR (OPTIONAL)
By creating a calendar we will establish the working hours and which are the holidays of the year.
The example company includes a calendar for the current year. In it the dates corresponding to the national holidays of the Spanish territory have been foreseen and a working day from Monday to Thursday of 8 hours and of 5 hours on Friday has been established. Modify it and configure your work calendar here.
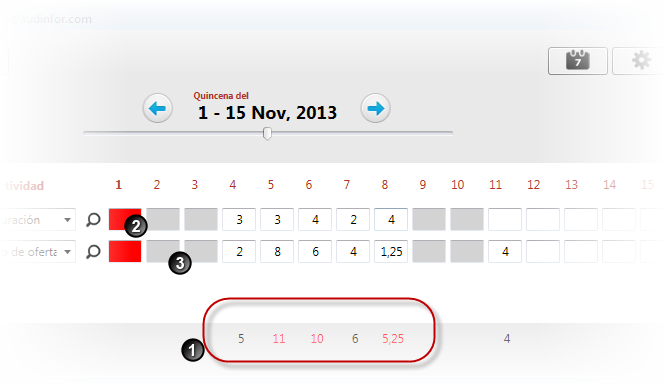
By assigning a calendar, we will ensure that in the time entry screen, the total hours of the workday will be displayed in red (1) if they have exceeded the stipulated workday.
If a calendar is assigned, the dates we have determined as holidays will also be marked in red (2). Days outside the weekly work schedule such as Saturdays and Sundays are marked in gray (3). It will always be possible to record hours on those days, but visually they are marked as non-working days.
Calendar year: We work with annual calendars from January 1st to December 31st and must specify which year the calendar we are creating is for. Tip: If we have different calendars for different work centers, it would be a good idea to differentiate them by calendar name.
Holidays: In this section, we will add the holidays of our work calendar. If we only enter a start date, the holiday will be that start day. If we write a start date and an end date, the holidays will be those within that date range (for example, if the company closes in August for vacations).
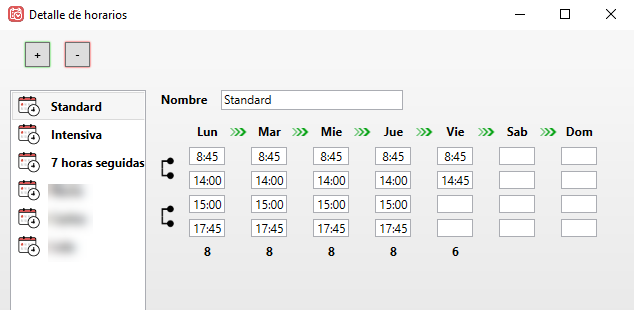
Schedules: The first line marks the schedule of a normal workday defining the number of hours for any given week. The following lines can be added to define date ranges where a different schedule exceptionally applies (for example, summer intensive schedules).
Clone: Use this function to duplicate a calendar and save time. But be careful because you should verify that the copied dates have the correct year! Just in case, we’ve left them in red so you don’t forget.
Is January of the next year approaching and you haven’t configured a calendar yet? It’s very simple, follow the steps in this video
![]()
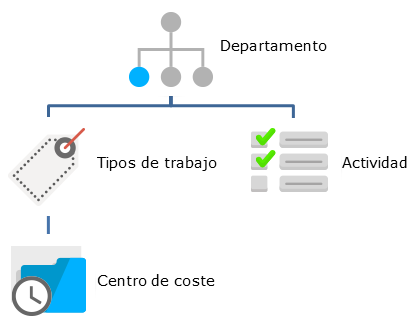
This section covers all aspects necessary to configure the application so that the user can enter time entries in the jobs they have been assigned to and that the activities to be performed are appropriate for those jobs.
COST CENTERS
In this section, we will add the jobs or projects we carry out in the organization.
Name: Identifies the job and is what will appear in the cost center dropdown for all users. For example “Gotham, annual accounts audit”, “
Code: Cost center coding. If desired, the program can complete the coding with the code previously assigned to the Department and Job Type.
Department: 01 Audit and consulting
Job type: 02 Annual accounts audit
Cost center: 010201 Gotham annual accounts audit
Description: Information that the user will see if they expand the cost center detail in the main screen.
CC Type: The cost center type can be billable, non-billable, or project:
Billable (default): There is a possibility to invoice the client for the work performed. It is a cost unit but also a revenue unit. If additionally the budgeted hours in the contract match the hours performed, then we’ve hit the jackpot.
Non-billable: These are recognized expense units but there is no identified client to whom we can invoice the time invested in performing the tasks. For example, if we have a quality management and control system (ISO, NICC, etc.), the time professionals spend maintaining it cannot be invoiced to any client.
Projects: In this case, time is being invested that is expected to be recovered later by transforming the cost center into billable. In practice, its operation is similar to a non-billable cost center. For example, a project would be the creation of a new department that will be responsible for creating web pages for clients; all hours dedicated to team training, research, model design, etc. would be chargeable to this project.
Job type: Optionally, it is possible to assign the job to a job type and therefore to a department.
Client: If we perform several jobs or projects for the same client, we can differentiate by creating a client and assigning the cost center to them. This can be useful if we want to know the hours invested per client.
Closure: When we close a project, no one will be able to enter hours in that job.
![]() Lock: Activating the lock does not close the project but temporarily prevents anyone from charging hours to the cost center.
Lock: Activating the lock does not close the project but temporarily prevents anyone from charging hours to the cost center.
BUDGET MANAGEMENT
A cost center, for example an audit job or tax advisory, may have a predetermined completion time. These hours are what, either through service contract or internal analysis, we have calculated make the job profitable. If we deliver the job in less time we make money, if not, we are losing it.
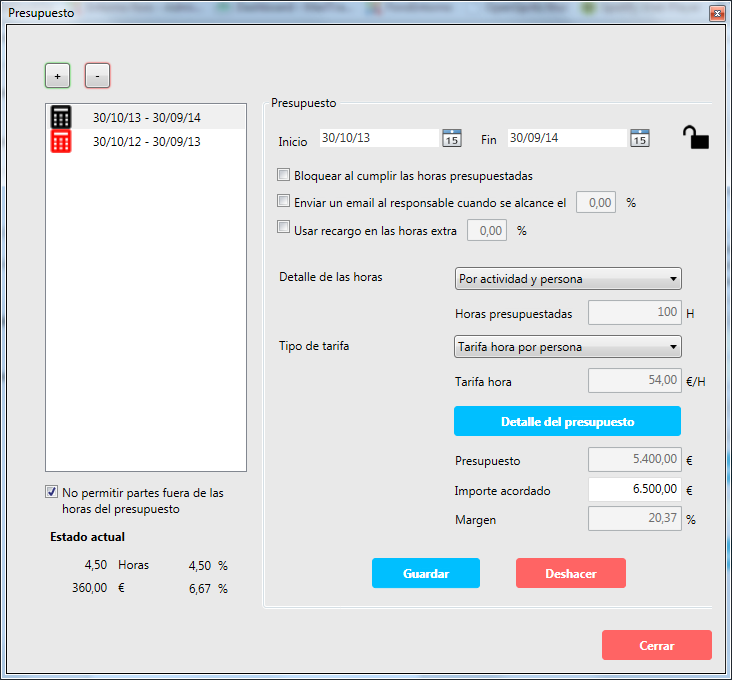
When we define a budget, we establish the start and end dates as well as the budgeted hours. When this budget has expired, meaning the end date has already passed, it turns red and, unless we mark the option of Not allowing entries outside budget, the team will be able to continue recording hours in the cost center.
What happens if I exceed the hours and go over budget? In principle nothing, unless we mark the ‘Lock when hours are met’ checkbox. In that case, when we exhaust the budgeted hours, no one will be able to record any more hours in the project or job.
NOTE: Budget locking is interesting when we want to prevent someone, by mistake, from entering hours against an already closed budget.
Heads up: It is also possible to send an email to the person listed as Responsible for the cost center when the number of budgeted hours reaches a certain x%.
Hour details
When budgeting and wanting to delve into the budget details, we can define the following:
• No details, only the hours it will take to complete the job or project.
• Detail by person, who (or what profile) will intervene and how long they will take.
• Detail by activity, we don’t know who will participate but we DO know what tasks will need to be performed and how long it takes to do them.
Rate type
The most interesting data to know, after the hours, is the cost we incur for each of them, and this will depend on the hourly rate of each person or even each activity. We can therefore establish:
• No cost calculation, we are only interested in the hours incurred.
• Rate per person
• Rate per activity
• Fixed rate, a single rate for all hours recorded in the cost center.
Budget detail
Once we have decided what level of detail and rate we need, we will press the details button and can enter as many lines as our budget has details. If we have chosen rate per person or activity, if these rates are in the staff file or in the activity file, they will be automatically filled in when we select them in the dropdown menu.
If the dropdown menu does not show the element we want, by clicking on the ‘magnifying glass’ we will probably be able to find it more easily.
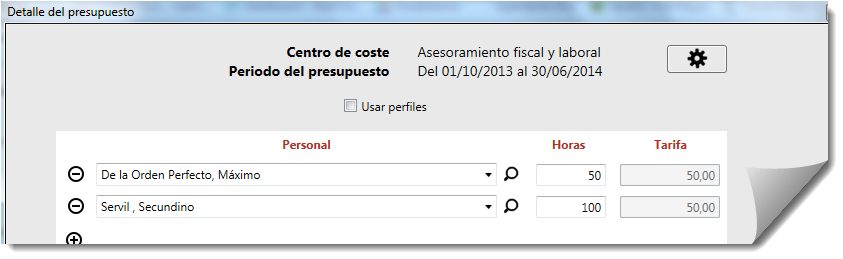
Agreed amount: It is optional but certainly interesting to report what the agreed price is because by doing so we will clearly see if the budget has a positive margin (right up) or presents with a negative margin from the start (right off).
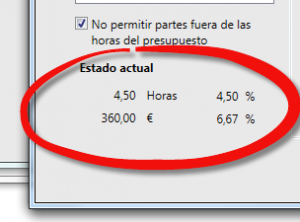
If hours have already been entered, in the lower left we will see the current status of the cost center; hours and costs incurred so far and percentage of budget fulfilled.
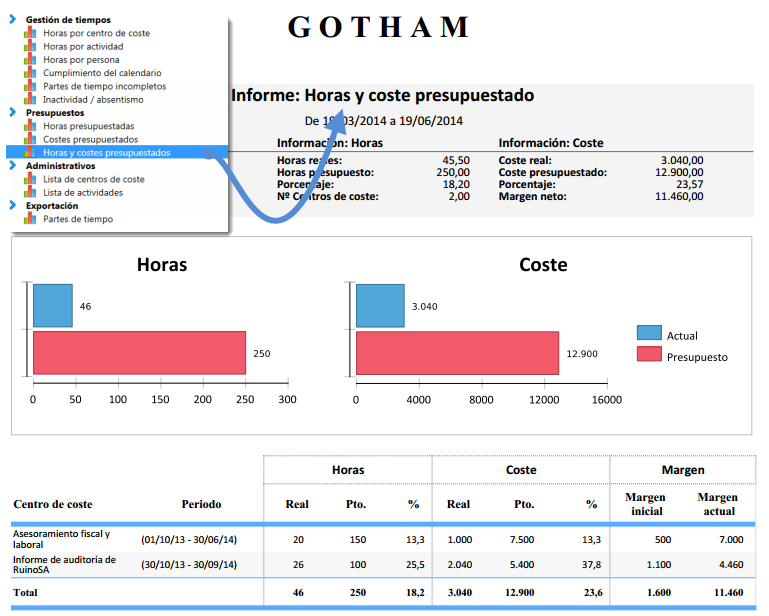
But to see more detailed information, it is best to use the “Hours and budgeted cost” report to see how we are doing compared to what was initially planned/budgeted.
ASSIGN THE TEAM
In this section, we can assign the team that will carry out this job and that will be assigned to the cost center. This means that only they will be able to enter hours in this cost center. For the rest of the users, the cost center does not exist. Optionally, the role that each member has within the team can be assigned. It can be Partner (especially designed for audit firms), Responsible (project manager, team leader), or simply member.
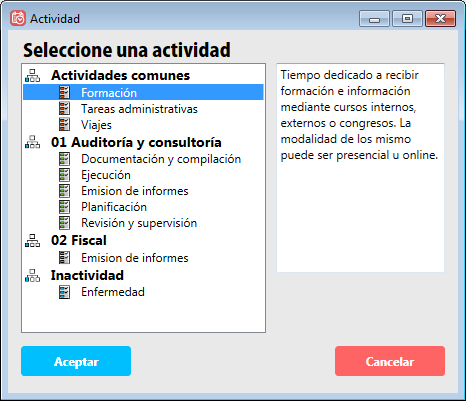
ACTIVITY
In ForTimimg, the activity is the task we perform at any given moment and that we do for a specific cost center that can in turn be billable (Gotham annual accounts audit job), non-billable (Administration, office tasks), or project (Web page design).
Activities can be normal (1) and assigned to a department to facilitate their search, they can be common (2), so that all organization staff can access them easily, or they can be Inactivity (3). The latter refer to activities that indicate time off work, either due to illness or vacation.
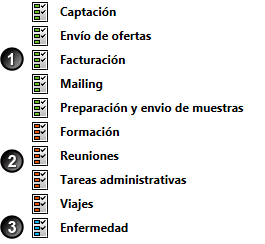
Examples of usual Activities can be:
Common (available to all):
- Meeting attendance
- Course attendance
- Filing
- Expense note/time entry entry
Normal (associated with your department)
- Planning
- Job execution
- Programming
- Report writing
Inactivity (time off)
- Illness
- Vacation
If we mark any activity as disabled, it will no longer be available to users.
COST CENTER ASSIGNMENT
This screen serves to quickly assign cost centers to a user. It is an alternative to the ‘assign team’ section accessible within each cost center where people can be assigned to a cost center.
Choose a user and you will see the jobs they have assigned. If you want to add or remove any, you just need to use the arrows.
In the Windows version it is possible to import the assignment of users to several jobs from the three dots located at the top of the screen.
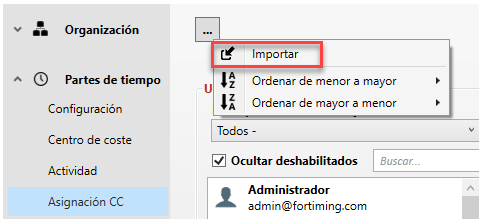
The import wizard has a template that, once downloaded, will allow us to fill in the necessary fields: User, Cost center (job) and Role (User, Partner or Responsible).
Assigning user role in the team from the user assignment to cost centers screen
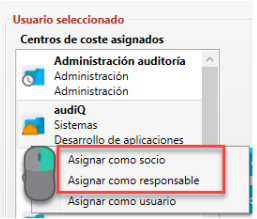
A user can be part of a team in three ways: User (default), Partner or Responsible. These last two roles can have visibility of all hours incurred in the cost center or job, as well as other functionalities such as authorizing expense notes assigned to that job. We have added the possibility to change the type of user role in a cost center from the cost center assignment screen (CC Assignment) so that the management of an administrator or responsible person assigning teams is as efficient as possible.
NOTE: Users will ONLY be able to enter hours in those cost centers to which they are assigned. If you are not on the team, you will not be able to enter hours. Talk to the administrator to have you assigned.
ACTIVITY ASSIGNMENT
Any user can perform any activity. From the ‘magnifying glass’ you can see all available activities, but the dropdown menu will only show those assigned to the user’s department. If no activities have been assigned to the department, it’s okay, the user will see all available activities by clicking the ‘magnifying glass’ icon.
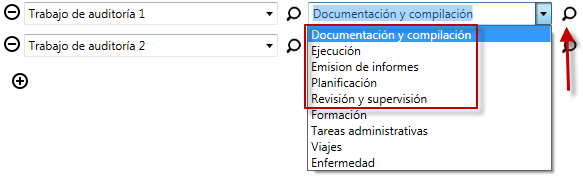
If we don’t find the activity in the main dropdown, we can always see the detail of the activities from the ‘magnifying glass’ icon.
And if we have properly assigned activities to each department, we will see the detail of all activities defined by the organization.
PERMISSIONS
If from the Staff section we could add the organization members who can use the application, from this section we will be able to define what they can and cannot do within ForTiming.
User roles:
![]() Superuser: When an account is created in ForTiming, this is the type of user assigned by default. They can add other users, assign them permissions, deactivate them, add cost centers, delete them, lock them, etc.
Superuser: When an account is created in ForTiming, this is the type of user assigned by default. They can add other users, assign them permissions, deactivate them, add cost centers, delete them, lock them, etc.
NOTE: It is not recommended to create more than one superuser per Company.
![]() Global / Local Administrator: Very similar to the superuser with the exception that they cannot assign permissions to users and cannot change data in the company form. For example, they could not self-assign more permissions and could not change the company logo.
Global / Local Administrator: Very similar to the superuser with the exception that they cannot assign permissions to users and cannot change data in the company form. For example, they could not self-assign more permissions and could not change the company logo.
The consideration of global or local depends on whether they can manage all of the above in all work centers or only that related to the work center where they are assigned. For example, a local administrator in the Madrid office could not deactivate an employee from the New York office.
![]() Responsible: If a team leader or project manager is assigned this role (from Administration>Application>Permissions), they will have permissions to manage the cost centers or projects where they have been designated as ‘responsible’ or ‘partner’ (from Administration>Time Entries>Cost Centers>Assign team). Likewise, they will be able to manage their budgets and choose which company members will make up their team.
Responsible: If a team leader or project manager is assigned this role (from Administration>Application>Permissions), they will have permissions to manage the cost centers or projects where they have been designated as ‘responsible’ or ‘partner’ (from Administration>Time Entries>Cost Centers>Assign team). Likewise, they will be able to manage their budgets and choose which company members will make up their team.
More information about the responsible role – tutorial.
![]() User: Most application users will have this type of permissions, which means they will only be able to enter entries but will not be able to access the administration panel. They will be able to see reports but only those related to their own hours.
User: Most application users will have this type of permissions, which means they will only be able to enter entries but will not be able to access the administration panel. They will be able to see reports but only those related to their own hours.
TIP: A recommended configuration for an organization would be the following:
Super Administrator: The Director or someone from the IT department.
Administrators: The Director (if not already a super administrator), the team leaders. If the company has several offices, the General Director would be the global administrator and the office directors, team leaders, etc. would be local administrators.
Users: All other staff who need to record hours.
REPORTS
![]()
Reports can be accessed from the time entry screen (Reports button) and from the Administration screen (Administrate>Reports button).
Accessing from the Reports button, the user can only see information about their hours.
Accessing from the Administrate button (only enabled for administrators and responsibles) the user can see information of all staff over whom they have permissions (the local administrator will only see the hours of staff from their work center, a global administrator will see the hours of all company staff , and a responsible will see the hours assigned to the cost centers or projects where they are named responsible).
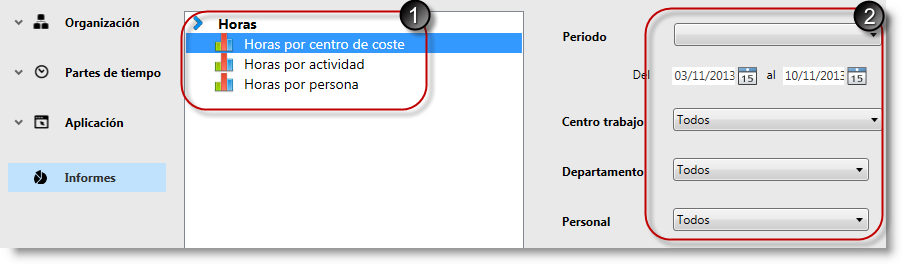
On the left side (1) are the available reports and on the right side (2) the filters necessary to obtain the information we want: Date range, cost centers, department, etc.
NOTE: To avoid obtaining reports with too much information or that is not representative, it is important to choose exactly the relevant information. To extract all data and analyze it in detail, it is best to export the data to .CSV.
OUTPUT
Reports are generated immediately on the graphics server and can be downloaded in Word, Excel, or PDF (recommended). In the case of some reports, they can be downloaded in .CSV format, a format compatible with Excel that would allow exhaustive analysis of the data, create personalized reports and graphs for each organization, etc. The use of Pivot Tables is recommended. You can contact us if you want us to help you do it or suggest the report you are missing.
Excel template with dashboard: In addition to exporting all data to CSV, there is the possibility of exporting it to an Excel file prepared with several automated dashboards that will help you assess the profitability of the time invested by the team.

Scheduled reports: If we consider a report useful, we can save its configuration and even schedule it to arrive by email every day, every week, once a month, etc.
HOW TO WORK WITH EXPENSE NOTES IN FORTIMING
Watch more help videos
The expense notes functionality allows users to record expenses they have incurred for performing their jobs, either during a trip or for any other reason.
Authorization process flow

Expense notes must follow a specific flow from when they are recorded by the user until they are settled.
In each of the authorization phases, there is a person responsible for reviewing the note and moving it to the next phase of the process. The assignment of which users participate in the authorization process can be done by a user with administration privileges and must be done from Administrate>Expense Note>Configuration by an administrator.
The process has the following phases
Expense note creation: The user enters the data of an expense note and the supporting documents.
Validation: The user with this responsibility must verify that the note complies in form and substance with the company’s expense reporting policy. If they detect any error in it, they must reject it indicating what the error is so that the user corrects it and sends it again.
If everything is correct, pressing the Validate button will make the note move to the next phase.
Authorization: The user with this responsibility will be the one who authorizes the expense and its allocation to the corresponding cost center. If they detect any error in it, they must reject it indicating what the error is so that the user corrects it and sends it again.
If everything is correct, pressing the Authorize button will make the note move to the next phase.
Settlement: Once the expense is authorized, another user, generally in the accounting or treasury department, will manage the payment of the expense to the user who registered the note, or the collection, in case there was an advance and the expenses are less than said advance.
Once the payment management has been done, the user with the responsibility to make the settlement will press the ‘Settle’ button and the note will move to the last phase.
Reception: When the user receives the settlement of their note, they must close the process by accessing the ‘Expense Note’ section of the main screen and pressing the ‘Settle’ button.
CONFIGURE THE AUTHORIZATION PROCESS FLOW
The configuration and assignment of responsibilities must be carried out by an administrator who should define the following aspects:
- Authorization flow responsibles: They must assign a user to validate the notes, another to authorize them, and another to settle them. This user can be the same or different.
- Notification frequency: As the process is completed, email notifications are issued. By selecting the frequency of these communications, emails can be sent 5 minutes after the corresponding phase is completed, once every 24 hours, or none sent.
- Mileage price.
- Expense note reference code format.
HOW TO CREATE AN EXPENSE NOTE
The user must access the ‘Expenses’ button on the time recording screen to create a new expense note.
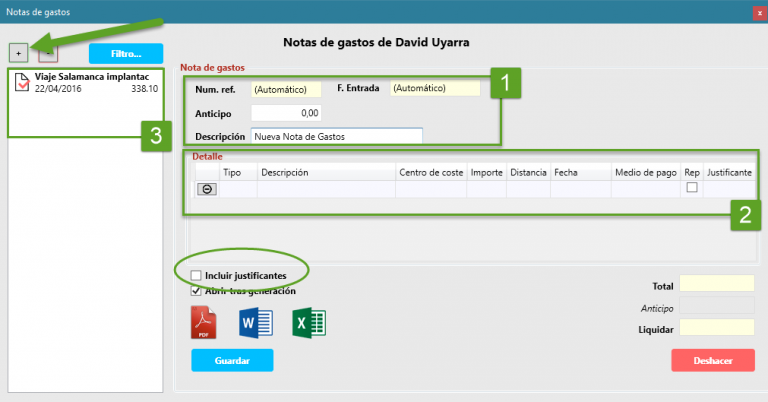
Each expense note has a main part (1) and as many details as specific expenses you want to describe (2). Normally, one detail will be entered for each expense supporting document (invoice, receipt) you want to justify.
As we create expense notes, they will be displayed on the left side of the screen (3). This section will show active notes by default, that is, those pending completion of the authorization process. If you want to consult the note history, you should use the ‘Filters’ button.
In the main part we have the following fields:
Ref. No.: The document reference number is automatically assigned according to the format defined from Administrate>Expense Note>Manage notes.
Date: It is automatically created at the moment the user sends the note to be validated.
Advance (optional): Amount previously delivered to the user to cover the expense.
Description: Text field that will allow us and the authorization responsibles to quickly distinguish this expense note detail from others.
In the details we have the following fields:
Type: Refers to the type or classification of the expense. It can be Meals (expenses intended for sustenance), Lodging (expenses related to accommodation), Transportation (trains, metros, buses, taxis, etc.), Mileage (travel made with own vehicle), or Other undetermined.
Description: Text field that will help us and the authorization responsibles to quickly distinguish this expense note detail from others.
Cost center: If we want the incurred expense to be associated with a specific job, we will select it in this dropdown field.
Distance (only for expense type = Mileage): Distance traveled in kilometers or the configured distance measure.
Date: Date on which the expense was incurred.
Payment method: Determine whether cash or company card was used.
Rep: If known, note whether the expense is chargeable to the client or not. If it is chargeable, it means we can recover it, and if not, it means it will be added to the total cost of the project.
Supporting document: Document justifying the expense. Documents in PDF and JPG format can be attached.
HOW DO I ATTACH EXPENSE SUPPORTING DOCUMENTS?
There are two alternative methods to attach a supporting document to the expense note:
Classic method: By clicking the upload icon, a dialog box appears asking us where the digital file containing the supporting document is. We select it and if the format is supported, it will be added to the expense note.
QR method: With this method, we can use our smartphone to take a photo of the supporting document and attach it to the expense note. If we click on the button with the QR code icon, we will see a scannable two-dimensional code that we can analyze with a QR code scanning application installed on our smartphone (for example, BIDI has an app for Android and another for iOS). We open the application, point to the code, and when it indicates, we will take the photo or select one from the photo library.
At that moment, that file will be added to our expense note.
PRINT THE EXPENSE NOTE
At the bottom of the ‘Expense Note’ form, you have the options to print each one separately. Select the note from the list on the left and press the PDF, Excel, or Word button. Check the “Include supporting documents” box if you want them to be printed as well.
If you are responsible for any authorization phase, you will see the notes pending your validation, authorization, or settlement. If you want to see the notes you have generated to justify your expenses, click the icon at the top right and the view will change between ‘Expense Note Administration’ and ‘Expense Notes of User X’.
PRINT FROM THE REPORTS SECTION
From the administrator reports view in the Reports button of the main menu you have the following report in the section called Expense Notes
Expense Summary: Shows the summary of all expenses for the defined period and groups them by cost center. Very useful to justify expenses incurred to the client.
DAILY WORKDAY REGISTRATION / TIME CLOCK
This module allows ForTiming users to indicate what their effective workday is. Currently, two registration modalities are allowed; Automatic time clock through the application (Windows or WebApp) and manual workday registration. In this latter option, the user will be able to register their workday manually from the application.
For this functionality to be visible to users, they must belong to a specific workday registration group. Those who are not assigned to a group will not be able to register their workday.
GROUP CREATION
![]() Group creation can only be done by an Administrator user by accessing Administrate> and creating a new group.
Group creation can only be done by an Administrator user by accessing Administrate> and creating a new group.
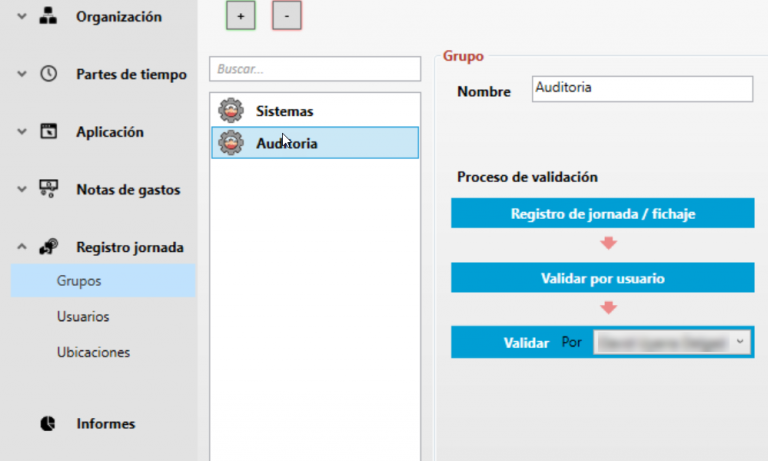
![]() Supervisor: This is the figure who will be responsible for reviewing and validating the workdays registered by the users. Each group must have a supervisor assigned.
Supervisor: This is the figure who will be responsible for reviewing and validating the workdays registered by the users. Each group must have a supervisor assigned.
![]()
Once the group is created and the different options configured, the people who make it up must be assigned.
CALENDARS AND SCHEDULES
To be able to perform workday registration, it is important to check that work calendars are well configured and add the corresponding schedule to those calendars.
From the blue three-dot icon, we can access the schedule generation menu where we can create the necessary schedules so that each workday has a specific schedule.
Once the schedules are created, we can assign them to each time slot of each calendar.
COMMUNICATE TO USERS
The person responsible for applying human resources policies in the company must communicate and inform users of the obligation to register their workday.
USER (MANUAL WORKDAY REGISTRATION)
![]() The user must access the “history” button, preferably every day at the end of their workday, and validate the proposed hours or access the hour detail (double click on the hour box) and modify the schedule where appropriate to adjust it to the effectively performed workday.
The user must access the “history” button, preferably every day at the end of their workday, and validate the proposed hours or access the hour detail (double click on the hour box) and modify the schedule where appropriate to adjust it to the effectively performed workday.
They can write comments if they consider it necessary.
Important: They must validate their workdays so that they are visible to the supervisor!
USER (TIME CLOCK)
![]() The user must press the door button (green to enter and red to exit) each time they start their workday, when leaving for lunch, when returning from lunch, and finally, when ending their workday.
The user must press the door button (green to enter and red to exit) each time they start their workday, when leaving for lunch, when returning from lunch, and finally, when ending their workday.
If they have forgotten to clock in or have done it incorrectly, they can access the history and, by double clicking on any of the hours corresponding to the desired workday, they can edit the detail of that workday.
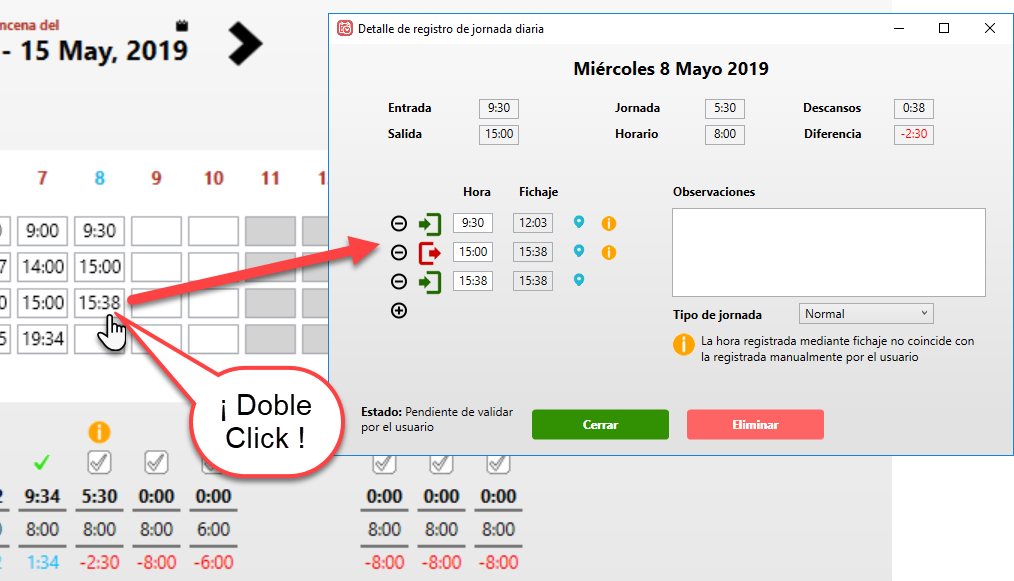
Mandatory comment: If there is a discrepancy between the clock-in time and the entered time (manual modification), it is necessary to write something in the Observations section to continue.
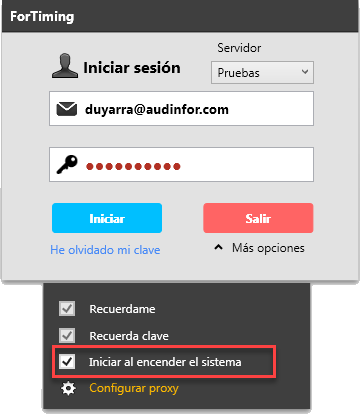
Automatic start: ForTiming will try to perform the automatic clock-in the first time you log in. It can be configured to start automatically with Windows from the Login>Options screen.
INCIDENTS
![]() The workday will be marked with an incident signal in the following cases:
The workday will be marked with an incident signal in the following cases:
- Difference in entry of more than X minutes compared to the theoretical schedule: The entry time does not match the theoretical schedule.
- Difference in exit of more than X minutes compared to the theoretical schedule: The exit time does not match the theoretical schedule.
- Difference in workday duration of more than X minutes compared to the theoretical schedule: The workday duration has been exceeded compared to the theoretical schedule / The workday duration is less compared to the theoretical schedule.
- Clock-in from unrecognized location: Clock-in from unknown location, the administrator must add the allowed locations.
- Clock-in different from registered time (manual change): The time recorded by clock-in does not match the time manually registered by the user.
These incidents can be modified from Administrate>Workday Registration>Groups
WORKDAY SUPERVISION
![]() For workday registrations to be formalized and official, they must be validated by the supervisor. Each group must have an assigned supervisor.
For workday registrations to be formalized and official, they must be validated by the supervisor. Each group must have an assigned supervisor.
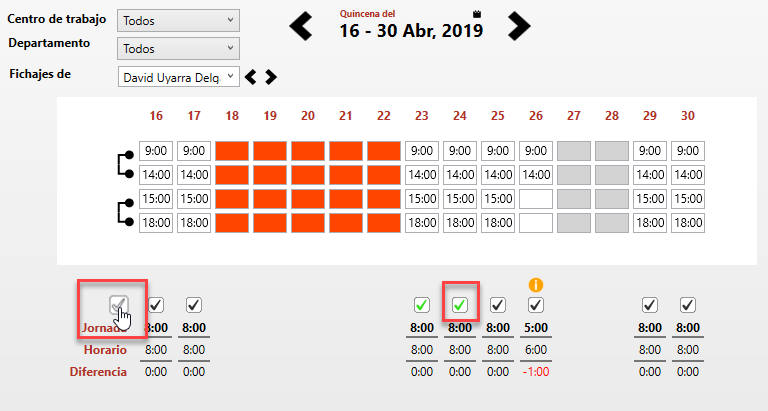
To access the validation area, the supervisor must access the “Validate” menu or icon where they will see the history of workdays that users have registered and validated. They can navigate through the users under their responsibility using the left and right controls, and the enabled filters.
VALIDATION
From the workday detail window, they can validate that workday or, directly from the validation screen, workday by workday or all visible workdays at once.
WORKDAY REVIEW, VALIDATION OR REJECTION
If they need to verify any of the workdays, they can double click on any of the hours and access the detail screen.

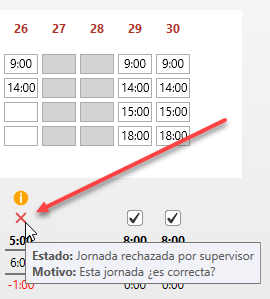
In case any of the workdays has a serious incident, requires some explanation, or for any reason must be corrected by the user, the supervisor will press the “Reject” button and write a comment. At that moment, the user will receive an email informing them that there are incidents in their workday registration that they must review.
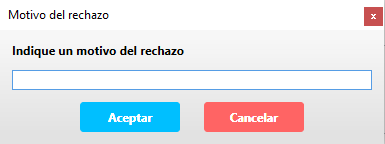
The user must then access their history, edit (double click on any of the hours of the workday in question) and modify their registration, noting observations if they consider it necessary.
Important: No supervisor or administrator role can modify user registrations. They can only request data changes for workdays through the Reject button on the workday detail screen.
REPORTS
Workday registration reports are found in the Workday Registration section.
ACCESS FROM WEB AND FROM A MOBILE DEVICE
To access the WebApp and access ForTiming’s workday registration from any equipment where the application is not installed, you can go to fortiming.com and access the option Log In
The functionality is the same except for the information view which will adjust to the daily view instead of the biweekly or weekly view offered by the desktop application.
Absence management
For the entry of any type of interruption or absence from work, users can do so through the absence management functionality.
For users:
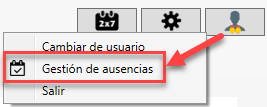
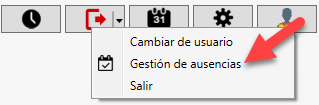
From the user and session options icon, you can access the user’s absence management section.

We can also access by double-clicking on any hour box and clicking the blue workday type button.
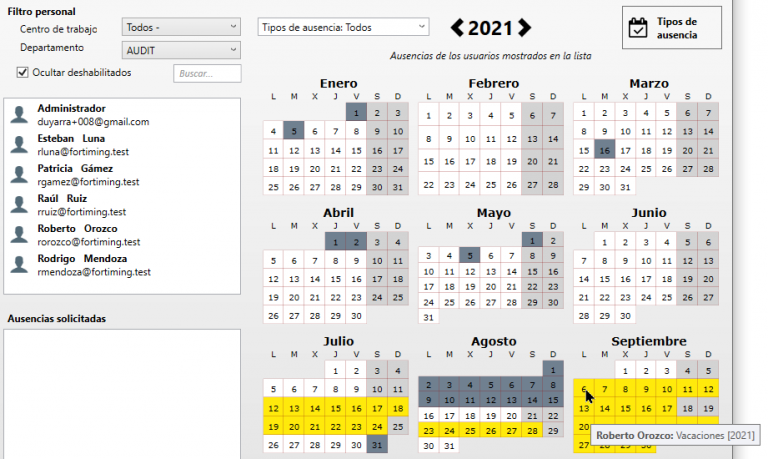
From there we will have a list showing the latest absences we have registered.
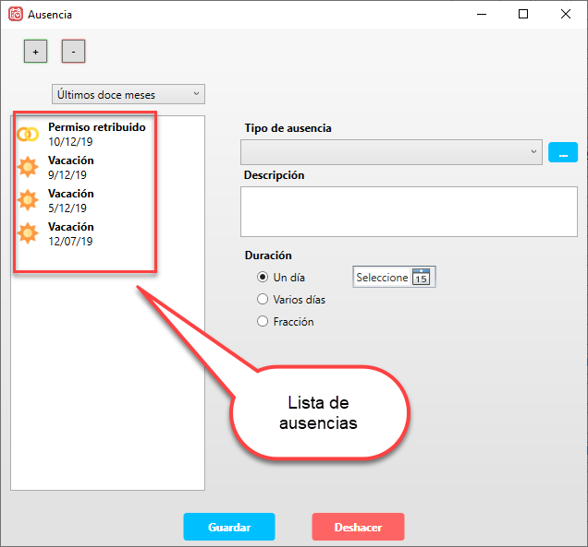
To add a new one, just choose the type of absence from the dropdown, write a brief description and set the period. This can be for a single day, several days, or even a fraction of a day. In the case of a fraction, we will set it in number of hours.
Attach supporting documents: Some types of absences may include the option to attach one or more documents.
For administrators:
A user administrator can manage the absences of users over whom they have administration permissions. To do so, they must access the section
Administrate>Organization>Staff
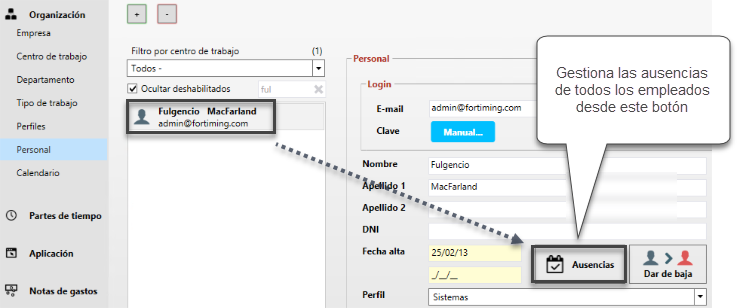
When we select a user, we will see a button where we can manage their absences.
Types of absences
By default, a series of absences are included that can be modified, disabled or to which new types can be added.

Vacation: This absence marks the day as if it were non-working and should be considered as user vacation. There is a module, still under development, that will allow vacation management, deduct those already taken and will have a request and authorization flow.
Illness: When a user is on sick leave or absent for some days (one only or even hours). In that case the theoretical hours of the workday are counted as 0 and the actual ones too. Allows uploading supporting documents.
Maternity / paternity: They have a behavior analogous to absence due to illness with the difference that it can only be added by an administrator.
Paid leave: The number of theoretical hours of the absence period is 0 and the worked ones too. Does not allow attaching supporting documents but does allow recording time reports in that period. (Example, I am entitled to a day for moving but at the last minute I connect to the office from my new home and help with support to a client for two hours).
Compensation / personal matters: The theoretical hours of the workday correspond to those of the calendar and will appear as not worked. It can be used to account for workday compensation for other workdays where you may have incurred overtime. It can also be used for those absences that are not justified or that must be recovered later.
Absence authorization
It is now possible to manage our team’s vacations in ForTiming. The new behavior of the absence module allows a Department Manager to verify and authorize their team’s vacations.
One of the functionalities that have been included is the possibility to see, at a glance, the vacations of the entire team, so that the manager can detect if there are days in the calendar where the entire team coincides on vacation or leaves the organization without resources, etc. Now, team leaders have greater visibility of absences.
How is it started?
Step 1 – Change the Vacation absence configuration
The first thing we must do is set vacations as a supervised absence type. For this, an administrator user with Absence Management permissions must access: Administrate>Organization>Absences>Absence Types (button at the top right) and access the following menu:
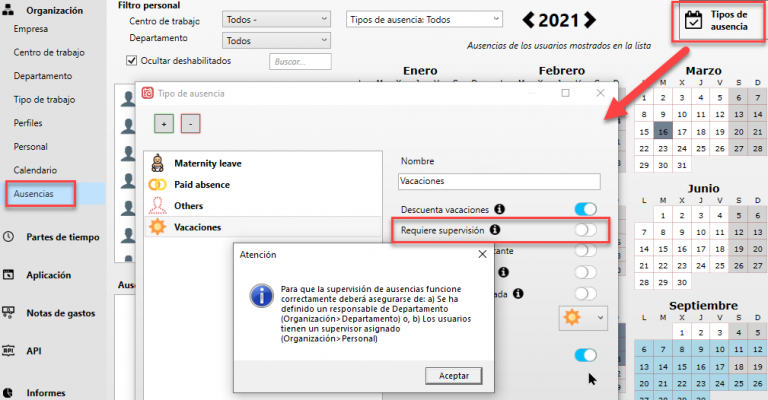
We must activate the option Requires supervision. When doing so, a notice appears indicating that, for supervision to work correctly, we must establish who supervises whom.
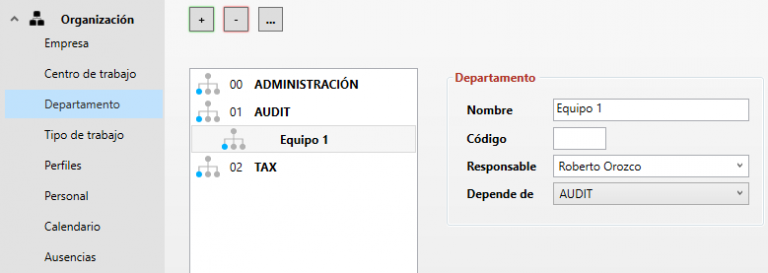
Step 2 – Establish a supervisor
There are two ways to do it:
1) Establish a Department Manager.
From the section Administrate>Organization>Department we will choose the corresponding Departments and assign a manager. It is possible that we have to modify the established hierarchical structure, so the Dependency field has been added to allow the creation of Subdepartments.
2) Establish a Supervisor for each user.
From Administrate>Organization>Staff you can select a worker and establish the corresponding Supervisor by choosing him from a list of users.

Step 3 – Complete the calendars
A new option has been added in the calendars, where you can add the number of vacation days, their expiration date and whether they are working or natural days.
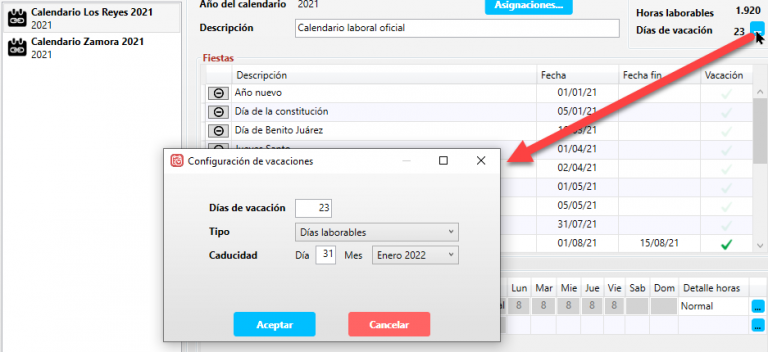
It is important that all calendars that affect any user have the vacation days defined to be able to correctly deduct the days and know how many are pending.
With these changes we have the system ready for users to request their vacations and be authorized by the supervisor.
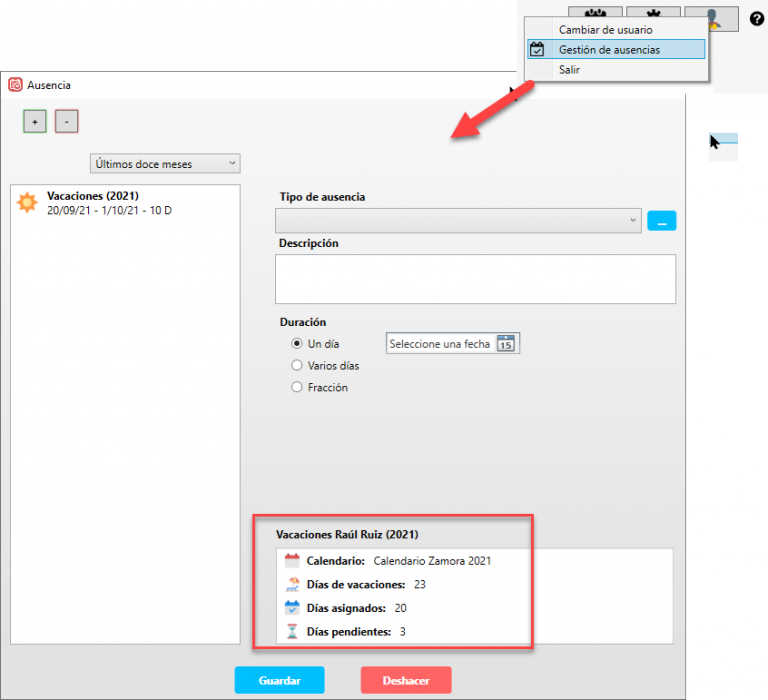
Request my vacations
A user can create their absence in the same way as before, they just have to go to the icon in the upper right part of the main screen and select the Absence Management menu.
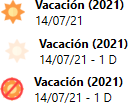
The following screen will be able to register absences that, if they require authorization, may show the icon in different ways, depending on whether the absence is authorized, pending, or rejected. If it is rejected, the user will receive an email with the supervisor’s explanations. In the same way, if approved, the user will receive a notification.
Validation of absences by the supervisor.
Through the absence management screen that you will find in Administrate>Organization>Absences, the supervisor will be able to see their team and when they select any supervised absence and right-click, they can perform the following actions:
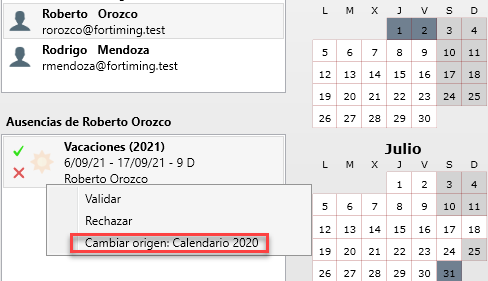
Validate: This means that they authorize the absence or vacation on the days requested by the worker so that that day or days will appear for all purposes as a vacation day, with a workday of 0 hours and it will not be necessary to indicate time reports for that day or days.
Reject: The absence will be marked as rejected and a notification will be sent to the user with the reasons.
Change origin to the previous year’s calendar. Very important, it is possible that some vacations already taken correspond to the previous year, if this is the case, the supervisor must mark them as such so that they do not interfere with the count of this year’s vacations.
API REST AND POWER BI CONNECTOR
With Power BI data connectors, you can connect and access data from an application, service, or data source. We have developed a custom data connector to access your data in ForTiming and use it in Power BI Desktop.
This service allows a ForTiming administrator user to access all data that that user has privileges to access through their ForTiming account.
We have also created a template so that you can access the data model without needing to know the internal structure of the data.
From that template you can create new pages, modify existing reports, create new measures and even upload the data to your Organization’s Power BI service.
Step 1: Request activation of the API module
If you want us to activate access for you, send us a request to admin@fortming.com and we will activate it for you. There is no cost for ForTiming premium users.
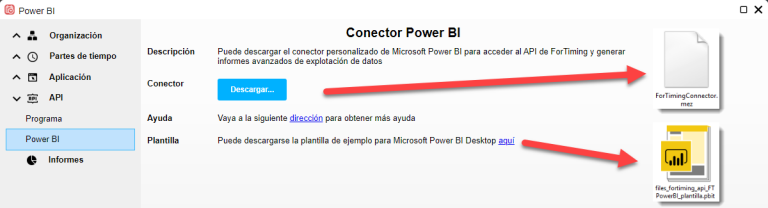
Step 2: Download the custom connector and template for Power BI desktop
From Administrate>API you can download these two files.
Check if your computer already has a custom connectors folder in Documents called “Power BI Desktop\Custom Connectors”. If not, create this folder.
Download the connector file (ForTimingConnector.mez) and place it in the custom connectors directory.
Download the template files_fortiming_api_FTPowerBI_plantilla.pbit and save it on your PC.
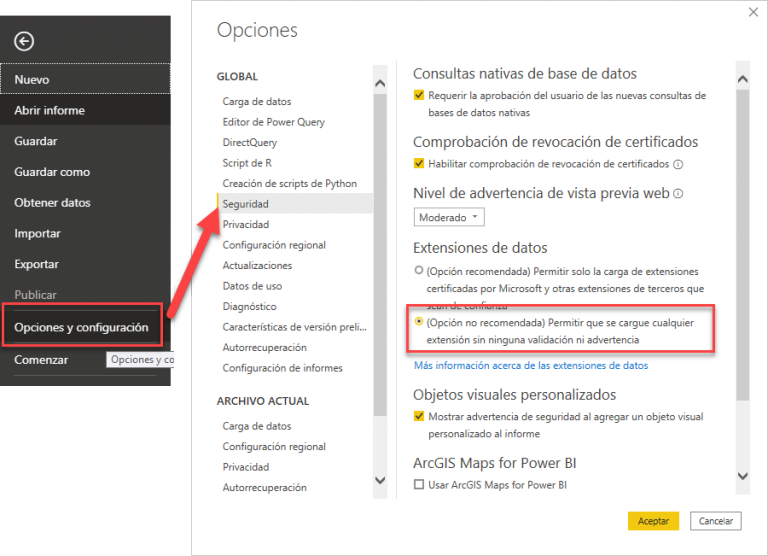
Step 3: Modify Power BI desktop security options
For Power BI desktop to allow the use of connectors not certified by Microsoft, it is necessary to modify the Security options. We are working so that, in the future, this step is not necessary.
Step 4: Run the template
Open the template files_fortiming_api_FTPowerBI_plantilla.pbit and you will see a screen asking for your ForTiming credentials. Fill them in to continue (remember that it must be an administrator user).
Subsequently, you will be asked for the following Parameters to access your data.
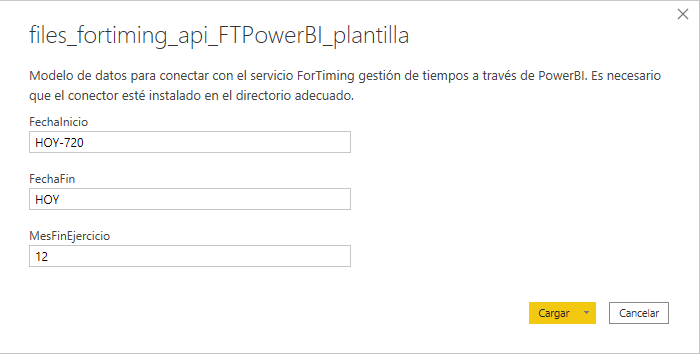
Startdate and Enddate: Calculates a date dynamically based on the current date of a company. The format of the fields Startdate and Enddate must be yyyy-mm-dd, Example: 2025-12-01
The following wildcards can be used:
- TODAY, TODAY-1, TODAY-2, … : Indicates the current date or the current date minus one day, two, ..up to 720.
- START_MONTH, START_MONTH-1, START_MONTH-2, …: Indicates the first day of the month, of the previous month, of 2 months ago
- END_MONTH, END_MONTH-1, END_MONTH-2, …; Indicates the last day of the month, of the previous month, of 2 months ago
- START_YEAR, START_YEAR-1, START_YEAR-2, …: Indicates the first day of the current year, of the previous year, of 2 years ago
- END_YEAR, END_YEAR-1, END_YEAR-2 …: Indicates the last day of the current year, of last year, of 2 years ago…
- YEAR(dd-mm), YEAR-1(dd-mm) : Indicates a fixed date of the current year, or of the previous year…
EndMonthFiscalYear: Serves to calculate the beginning and end of the fiscal year and facilitate period selection. For example:
- Year-end closing on December 31: 12
- Year-end closing on August 31: 8
When you click load, the data will be loaded and you can use the dashboard and modify it as needed.